Send Your First Transactional Email
At a glance
Sending email is what Mailchimp Transactional is all about. But before you can start sending, there are a few things to set up. In this guide, we’ll configure your DNS records, verify that you own the domain you want to send from, and walk through sending your first transactional email to verify that everything is working correctly.
For more granular documentation about setting up Mailchimp Transactional, see Authentication and Delivery. For details about sending messages—including prioritization, scheduling, images, and more—see Outbound Email.
What you’ll need
A Mailchimp Transactional account
A domain you’d like to send from
Access to the DNS records for that domain
Transactional vs Marketing Email
Before configuring your servers to send email with the Transactional API, let’s distinguish when you’ll want to use Mailchimp Transactional—and when you want to use the Marketing API instead.
If you’re sending bulk email, you should always opt for the Marketing API. The Marketing API won’t just help you send those bulk emails—it also helps you create and refine the audiences that you’re planning to send those emails to.
You can use the Marketing API for:
Marketing emails about an upcoming sale
A weekly newsletter
An email about an upcoming event
You should choose Mailchimp Transactional when you want to send an email to an individual, usually in response to some event happening in your application.
You can use Mailchimp Transactional for:
Password reset emails
Purchase confirmation emails
Shipping notifications
Forum activity
Note: You may at times be able to use the Marketing API where you might traditionally reach for transactional email. For more, see Track Outside Activity with Events.
Add a sending domain
First, you’ll need to add the domain you’d like to send your emails from. For this guide, let’s say we want to send email from info@example.com. That means our sending domain is example.com.

Navigate to Sending Domains in your Mailchimp Transactional account. Enter your domain name in the domain input (e.g., example.com) and click Add.
Configure your DNS
Now, let’s set up DKIM. Next to your domain, click View DKIM settings. A modal will appear with instructions to set up DKIM on your DNS provider. You’ll need to set up two new CNAME records with your DNS provider for your domain with the provided values.
Once you’ve set up the CNAME records for DKIM, you can verify that you configured everything correctly by clicking Test DNS Settings. Your DKIM settings should now indicate that it’s valid.
First, let’s set up DKIM: Next to your domain, click View DKIM settings. A modal will appear with instructions to set up DKIM on your DNS provider. You’ll need to set up a new TXT record with your DNS provider for your domain with the provided values. The domain name will look something like mandrill._domainkey.example.com, and the value will contain a long string that you’ll want to copy and paste.
Note: Adding CNAME records varies by DNS provider, so if you don’t know how to do this with your provider, search their documentation or contact their support.
In addition to DKIM, you are required to set up a DMARC policy. Like DKIM, this process will vary depending on your domain’s hosting provider. Your DMARC policy can be set to p=none. As long as a policy exists, it will pass authentication.
DNS records can take time to propagate, so if these records are still shown as missing and you’re confident that you set up your records correctly, you may have to wait for your DNS provider to propagate those changes.
Verify domain ownership
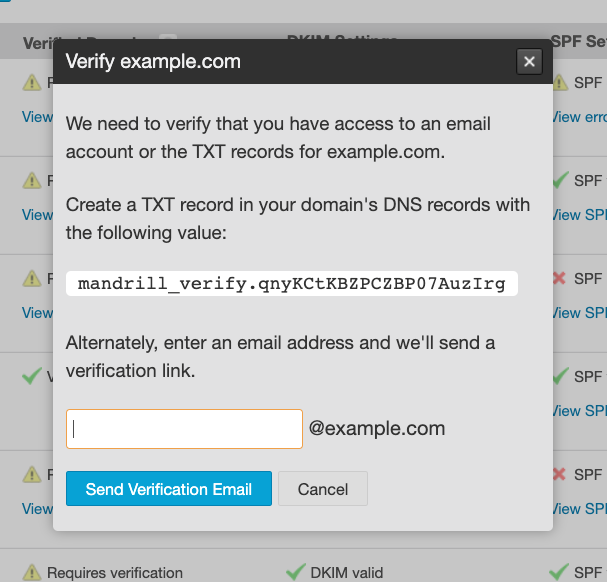
Finally, you’ll need to verify that you can receive email at the outbound email domain you just set up. We won’t go into every possible way you can set up inbound email on your server, but if you don’t already have inbound email set up, see “Set Up Inbound Email Processing.”
Verifying your email is as simple as entering a valid email address where you can receive email, then clicking a verification link Mailchimp sends to that address.

To send that email, click the View details link below the Requires verification warning; enter a valid email address and click Send Verification Email.

In the email, you’ll receive a verification link that looks like this:
http://mandrillapp.com/settings/verify-domain?domain=example.com&key=VERIFICATION_KEY
Click the link, and your domain should now be verified.
Send your first email
With everything set up, we can start sending email from your sending domain.
The simplest email you might send looks something like this:
Send your first email
MESSAGE='{"key": "$YOUR_API_KEY", "message": {"from_email": "hello@example.com", "subject": "Hello World", "text": "Welcome to Mailchimp Transactional!", "to": [{ "email": "freddie@example.com", "type": "to" }]}}'

curl -sS -X POST "https://mandrillapp.com/api/1.0/messages/send" --header 'Content-Type: application/json' --data-raw "$MESSAGE"
If you receive this email, that means everything is up and running—and you’re good to start sending transactional email!
Note: Once you start sending email, you’ll want to familiarize yourself with some of the basics of sending with Mailchimp Transactional. Outbound Email will give you details about messages themselves, but you should also review Reputation and Rejections to ensure you maintain the highest level of deliverability, and Activity and Reports to analyze your sent messages.